

Many PowerPoint users can easily create a group from multiple objects. However, they often don't realize that they could handle the processes of creating and ungrouping more easily or quickly, and that working with groups also solves various application problems.
Our blog series on the topic of groupings consists of three parts. This first article covers the following points:
1. Basic functions of grouping
2. Actions within the group
3. Instructions for animating a group
4. Display of groups in the selection menu
Click here to go to Part 2 and Part 3 .
1. Basic functions of grouping
Grouping allows you to edit multiple objects (shapes, photos, etc.) simultaneously. You can then edit the group (like a normal shape).
- turn
- move
- enlarge or
- reduce
This speeds up and simplifies many changes to individual shapes at once, and prevents accidental shifting of individual elements relative to each other. A simple example: You want to rotate the square with the arrows by 45 degrees.
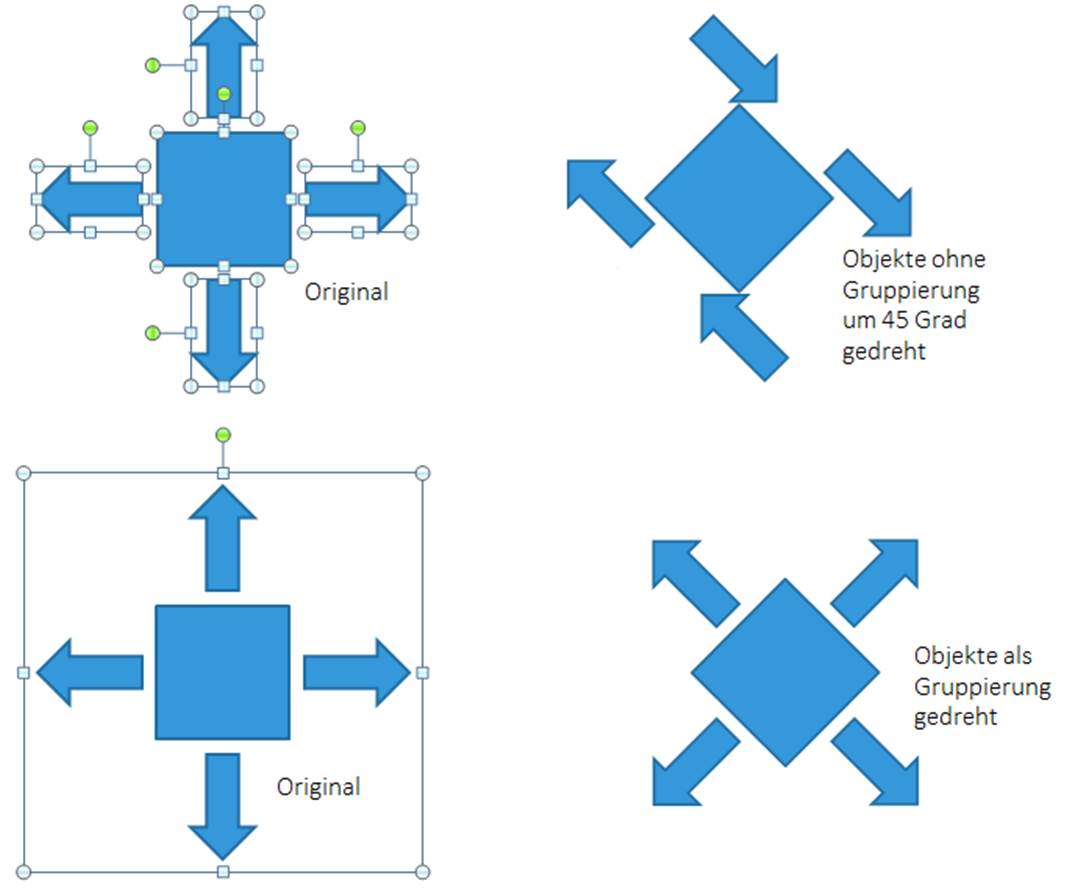
You can change the attributes of all objects in the group simultaneously, for example, setting a shadow or color fill. This saves a lot of time.
1.1 How is the grouping done?
To group different objects, proceed as follows:
A. Select the objects to be grouped together by clicking on them individually with the SHIFT or CTRL key, or by holding down the left mouse button and selecting all the objects you want to group.
B. Next, a frame containing all selected objects will be shown. The frame's dimensions always correspond to an outer, imaginary boundary of all objects – regardless of their location on the slide or their distance from each other.
C. Normally, you access this function via > Drawing Tools > Format > Group > Group . If the selected objects have already been grouped together, then select > Regroup .
D. Here you can see the grouping instructions again when you hover your mouse over the button.

 Of course, you can also ungroup a group: Go to the section > Drawing Tools > Format > Grouping > Ungroup. After clicking, you will immediately see all objects in the group displayed individually with their respective frames.
You can also use these hotkeys:
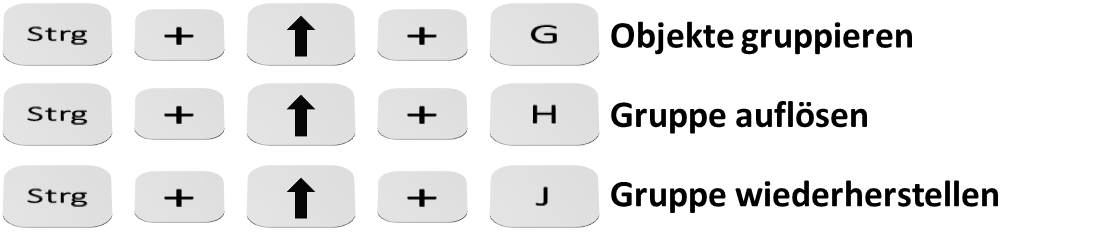
In the same way that you group individual objects, you can also combine two or more groups into a single grouping. To then ungroup these objects, you may need to perform the "Ungroup" action several times – until all objects truly exist individually again.
ATTENTION: If a group has already been given an animation, the animation will disappear after the group is ungrouped!
If you combine a large number of groups into further groups on a slide (there is no numerical limit), your computer's performance will suffer. This is because the more groups there are on a slide, the slower the processor becomes.
This problem is exacerbated if you want to animate (a very) large number of (grouped) groups. Should this occur, try reducing the number of groups by...
- place one or more groups as graphics or
- assign simultaneous animation to multiple groups or
- reduce/simplify complicated/combined effects or
- Perhaps animate (almost) all groups as images. (Tip: If you need the many groups for later changes, take the original version and place it next to the slide as a basis!)
1.2 Clicking on a group is not possible
A common problem when working with groups: The buttons for the group are inactive, i.e., they are only displayed in gray. This is usually due to one of the following reasons:
- Only one object is selected – you always need at least two objects for a group.
- The shapes cannot be grouped with placeholder text.
- Objects selected for the group are located on the slide master.
- A photo or graphic may not be a group and cannot be resolved.
1.3 Ungrouping clip art
Does this sound familiar? You include a clipart image in your presentation, but you don't like the colors or you want to delete parts of the image? Understanding grouping is very helpful in this situation as well. To make the desired changes, you first need to ensure that the clipart is a Windows Metafile (WMF), meaning the filename has a ".wmf" extension after the dot. Then proceed as follows:
1) Select the graphic and choose > Ungroup .
2) The displayed message appears, which you confirm with "Yes". Initially, it seems that not much has changed.
3) Ungroup a second time and all elements of the graphic will appear as individual objects.

Now click outside the clipart area. You can then select, copy, recolor, or rotate any desired individual element – and optionally reassemble all the elements into a (new) group. The latter is recommended, as it ensures that all parts of the graphic are combined into a single image and prevents you from accidentally deleting or otherwise altering individual elements.
You may need to ungroup such graphics several times to ensure you get all the objects. If the "Ungroup" command is unavailable, you don't have a graphic composed of individual parts. For example, you cannot "ungroup" a photograph.
1.4 Enlarging and reducing group sizes
You can change the size of a group at any time. However, you should click on the outer frame and hold down the SHIFT key to ensure that the proportions of all objects within the group are adjusted accordingly.
A. The Original Group
B. The group enlarges
C. Greatly reduced in size

Otherwise, the objects in the group may be displayed in a distorted manner - as can be seen in the next image.

A. On the left you see the already familiar original group – here supplemented with a grey circle with a red outline and text.
B. Now move the right frame to the right, and you will see the distorted image, but the number at the top and the text will still be in their original state – while the circle has become an ellipse.
C. Moving the right frame far to the left produces the same effect. Since the text no longer fits within the gray circle, the letters are displayed on top of each other, just as in the text box. However, the font size remains the same.
2. Actions within a group
The tasks described in the first chapter are certainly familiar to many users and are frequently employed. Less well-known are the possibilities for manipulating individual objects within a group WITHOUT dissolving the group! In older versions, this was absolutely necessary. After making changes, the objects then had to be regrouped. The advantages are obvious:
- Faster and easier action
- Subsequent corrections are also possible.
- Minor adjustments to individual objects are possible at any time - without dissolving the group.
AND: The animation chosen for the group remains in place! This is a great advantage, especially with very complex animated images.
Another example: When creating a comprehensive organizational chart, you have grouped and summarized the information for each employee. If the individual staffing levels change, you can modify or replace the entries without dissolving the group.
2.1 Modifying individual elements
To change individual elements of a group, proceed as follows:
- First, click on the group. The entire frame will be displayed.
(1) Then click the element you want to change. It will be indicated as selected by its border, and the outer border of the entire group will be displayed with a dashed line. You can then change only this element as desired.
- (2) Here the text was changed in color and the photo was artistically altered.
- (3) The photo was given a frame and rotated.
- (4) The photo was reduced in size and rotated, the number “4” was made to glow and the text below was given a colored background.
- It was not necessary to disperse the group.

2.2 Selecting multiple elements
You can also select multiple objects within a group by pressing the SHIFT or CTRL key while clicking with the mouse (see next image).
A. On the left you can see the original group.
B. If you have selected the entire group and now want to change the fill, for example, you have the problem that the fill (in the example image the color gray) is also applied to the photo.
C. However, if you select only the two "text objects" as described above (SHIFT key), the photo will remain as the fill. This allows you to modify only the elements you explicitly click, even in larger groups. If you make a mistake while selecting, you can deselect them individually using the CTRL key.

2.3 Consider changes in group size
The selective selection option also allows you to move objects within a group without ungrouping them. Moving objects changes the overall size of the group. This can potentially lead to unintended overlaps with other elements, which might not be consciously noticed and could interfere with selecting/clicking objects.
A. On the left, the original group. Next to it, a blue circle. In the planes, the group lies above the circle.
B. Only the photo was shifted to the right. Consequently, the group's frame becomes larger. Since the circle is completely unobstructed, it can still be clicked.
C. The lower text is also shifted to the right and partially overlaps the circle. It cannot (always) be selected. Depending on how close the circle is to the text, it may still be possible to click on it at the edge/side.
Furthermore, moving the lower text has resulted in the entire group being smaller on the left side.

Of course, the position of the circle within the layers also plays a role. See section 4 ("Displaying the group in the selection menu") for more information.
2.4 Copying individual elements within the group
Many users are unaware that objects within a group can be copied without having to ungroup the item. Select one or more objects in the group and press SHIFT + D.
A. The circle was copied
B. The second circle is now marked
C. … and shifted downwards. Nevertheless, the group always remains intact.

2.5 Changing Groups
Once you've changed the attributes of the shapes in a group, the procedure seems clear. However, you can also achieve other interesting results, as you can see in the next image.
A. Nine ungrouped squares.
B. All squares were marked. Their fill was selected using a photo of a cloud.
C. Here, the nine squares are grouped. Then, only the group is selected and filled with the identical photo. The image is now displayed across all squares.
D. You can also further modify the group using 3D settings and achieve quite interesting results.

The possibilities for further visual changes are virtually unlimited:
A. The group from the previous image again, with the cloud as fill.
B. For the following actions, simply click on the group. This will change all individual shapes simultaneously! Using > Drawing Tools > Format > Edit Shape > Change Shape > Ellipse, the squares were transformed into circles with a new fill.
C. The shape was changed again and the depth was increased in the 3D settings.

2.6 Groupings and the Shadow
The visual effects can vary greatly when a shadow is placed on an area.
A. On the left you can see the ungrouped squares.
B. All nine squares were marked and given a shadow, which then exists for each individual square.
C. All nine squares were grouped.
D. The result looks as if the nine squares were a single object and the shadow refers to the overall shape.

2.7 3D representations of groups
A group of several shapes can be ideally modified visually using the 3D settings. Settings > Format Shape > 3D Format > Bevel > Circle, Width/Height 50pt each.
In the next image, you will see ungrouped shapes in the left column and the same settings for shapes grouped together on the right.

A. Initial image: on the left are individual shapes, on the right are all shapes in one group.
B. Now the graphics were given a chamfer by right-clicking > Format Picture > Format Shape > 3D Format .
C. The crucial difference becomes visible with the next setting. Now the graphics have been rotated using right-click > Format Picture > Format Shape > 3D Rotation > Perspective > above level 3. In the left column, each part is rotated individually, while on the right side, the entire graphic is rotated, creating a realistic 3D image.
To further illustrate the point, the last graphic was copied and rotated in various ways.

The graphic is always displayed correctly in three dimensions as a group. This approach therefore offers
- diverse possibilities to develop completely new images / graphics,
- to recreate existing 3D models (possibly in combination with shape merging) or
- to design completely new forms.
3. Animation of a group
Animating groups follows essentially the same rules as animating individual objects, except that the effect is applied to the entire group. However, as is often the case, there are some special considerations.
For example, a group is often animated first and then resized later. Often, for instance, after enlarging a group, other elements on the slide are covered up, elements that were clearly visible when the group was animated before it was enlarged.
A. The group without animation.
B. Here, the original group rotates around its center. The green circle roughly shows the extent during rotation.
C. Within the group, the rectangle was shifted slightly to the right. The group is rotated identically, but the space required for the movement is larger overall (red circle) because the group was enlarged by shifting the triangle.

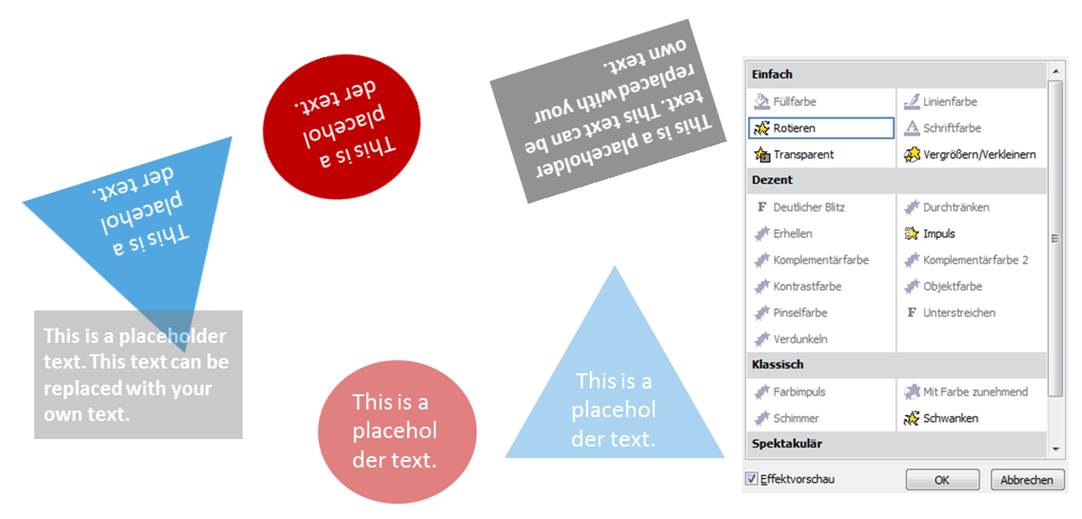
WARNING: Highlighting effects can drastically alter the design of an object. Highlighting effects typically only apply to a single object. Therefore, most effects in this category are not applicable to groups.
In the next example, you see the Rotate effect (A) at the top and the Transparent effect (B) below it – most other effects are not selectable. If individual objects absolutely must be animated with the effects shown in gray (C), the group must be ungrouped.
4. Display of groups in the selection menu
In PowerPoint, all elements are not only visually arranged next to or on top of each other, but they are also organized into individual layers. This arrangement can be visualized as a stack of, for example, boards arranged in various configurations. You can change the position of an object within this stack as needed. To better view this stack, go to > Drawing Tools > Format > Selection Pane . Here, in the newly opened menu, you can see ALL objects contained on the slide. Objects located on the slide master are not included in this list.
A. In the following image, three shapes are shown individually on the left. Since they were designed first, they are listed at the very bottom of the selection menu. Every subsequent element added after these shapes is placed above them.
B. In the middle, the shapes are shown after they were copied and grouped together. The group was created after the three individual shapes and is therefore at the top of the list – regardless of the layer position of the individual copied shapes beforehand.

Accordingly, the levels within the groups are decisive (see next image). However, you can change the level of individual elements within a group at any time. To change it, simply click the element in the selection menu and use the arrow buttons in the menu to move the element up or down.
A. The red circle lies above the grey rectangle and below the triangle.
B. In the actual group, the triangle lies BEHIND the ellipse and IN FRONT of the rectangle. Again, remember: always keep in mind that the plane's position is independent of its location on the slide.

Since the naming of the various forms is done solely through default names and numbers, it's easy to lose track when dealing with many objects. Therefore, you should change the names in such cases.
Making a change is very easy:
1) Click directly on the text in the list and this line, as well as the object itself, will be highlighted on the slide.
2) Click a second time in this line and you can now change the name.
In the next image, both group names have been changed.

When a group is dissolved, all shapes in the dissolved group appear above or below other existing objects, depending on the level at which the group was previously located.
In the next image, a green arrow was inserted across all objects. Then the blue group was ungrouped. All elements of the blue group are now located under the arrow in the layer view.

The "Selection and Visibility" menu includes another feature that is particularly useful when you have many objects on the slide: You can make individual elements or even entire groups invisible at any time – without deleting them. Simply click on the "eye" icon to the right of the label, and the selected element will no longer be visible.
A. The already well-known original group.
B. Here the green circle has been deleted.
C. This group looks exactly like the one in B). However, here the green circle was not deleted, but only made invisible in the selection menu.

The next image further illustrates the possibilities of the selection menu. You can see both groups and the two "missing" ellipses.
A. When the blue group is displayed, the "eye" is not present and the circle is therefore not visible.
B. The circle was deleted in the grey group.

We hope you enjoy trying it out!