
PowerPoint Backgrounds: How to Make Your Presentations Pop
A slide background is a key design element in any PowerPoint presentation – its visual impact and value should never be underestimated.
But choosing the right background can be a challenge. In this article, you will learn how to change, edit and customize the PowerPoint background to match your corporate style. Make your presentation pop with the right background!
PowerPoint backgrounds: your options
PowerPoint offers a variety of ways to customize slide backgrounds. You can choose single-color backgrounds or use your own pictures – whatever suits your needs. Here are the different PowerPoint backgrounds:
- Monochromatic backgrounds
- Color gradients
- Patterns
- Your own pictures
- Images from the Internet
- Icons
Keep reading to learn how to apply and edit each of these backgrounds in your PowerPoint presentation.
Bring color into play
PowerPoint has a wide range of color options for presentation backgrounds. You can opt for a simple, monochrome background, or add color gradients and patterns. Make sure the slide background actually stays in the background – a presentation background that’s too colorful can quickly overwhelm your content and look unprofessional. Use colors wisely.
Set a monochromatic background
Do you want to change the default white and adjust the color to your corporate design? No problem, here’s how it’s done:
1. Select the slide where you want to add or change the background.
2. Now click on the Design tab in the tab and select Format Background from the Customize group.

3. In the Format Background panel, select Solid Color Fill. The default background will disappear.
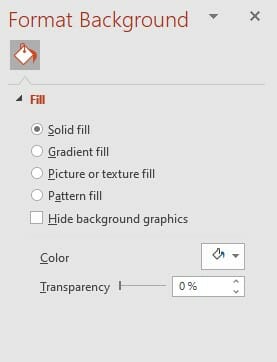
4. Click on the arrow next to the Color button. A new window with the color palette will appear.
5. Select your color. Click More Colors… if you can’t find the color you’re looking for and to apply more nuanced shades.
6. Use the Transparency slider to change the opacity of your color. The further you move the slider to the right, the more transparent the background color becomes.
7. Your background will now be changed to the selected color.
Tip: If you want to set the same background for all the slides in your presentation, use the slide master.
- Go to View > Slide Master, which is found in the Master Views group.

2. Now select the slides with the backgrounds you want to change from the thumbnail pane on the left.
3. While still in Slide Master, click Background Styles and select Format Background….
4. Set your desired background color.
5. To change the background for all slides, select Apply to All at the bottom of Format Background pane.
Set a color gradient
A gradient is a bit more elaborate than a monochromatic background. But don’t go overboard! The background should align with the rest of your presentation and never overwhelm your content. Set a color gradient as follows:
1. Follow steps 1 and 2 as described above for a monochrome background.
2. Now select Gradient fill.
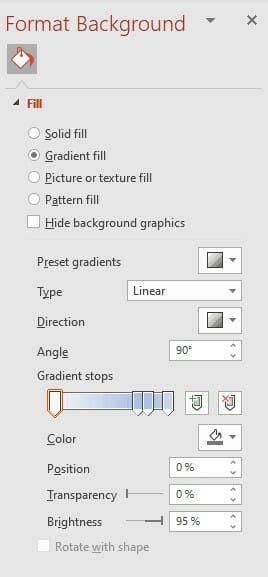
3. Open the drop-down menu to the right of Preset gradients and select your background.
4. Now you can customize your gradient. To do this, go to Gradient Stops and select one of the sliders to make your changes.
5. The two icons to the right of the color bar allow you to add additional sliders for further customization.
6. Type allows you to specify the type of gradient from the drop-down menu, e.g., Linear, Radial, Rectangular, etc.
7. The Direction setting allows you to specify where the gradient starts and stops (e.g., Bottom Left to Top Right, Linear Down, etc.).
8. You can also adjust the Transparency and Brightness of gradient.
Insert a Pattern-Fill Background
Another option is the pattern-fill background. Here is how you add one:
1. Follow steps 1 and 2 as described for a monochromatic background.
2. Now select Pattern fill from the Format Background pane.
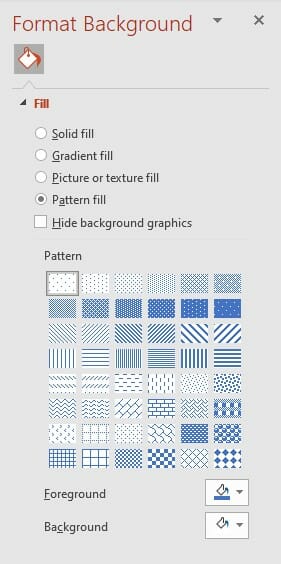
3. This will open a selection of pattern templates. Click the pattern you would like to insert.
4. Next, adjust the color as needed using Foreground and Background.
Using pictures for your PowerPoint background
Pictures are a fantastic way to create unique backgrounds that support your content. These pictures can be edited to fit your slides and even made transparent. This section will show you how to best use pictures as PowerPoint backgrounds.
Inserting a picture as a background
1. Right-click the slide.
2. Select Format Background from the drop-down menu.
3. Select Picture or texture fill from the Format Background pane on the right.
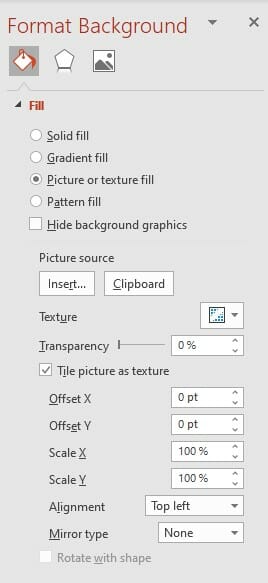
4. Click Insert… under Picture source (Insert picture from in older versions) to search for the picture you want to use.
5. This will open the Insert Pictures window. You now have four sources to choose your picture from:
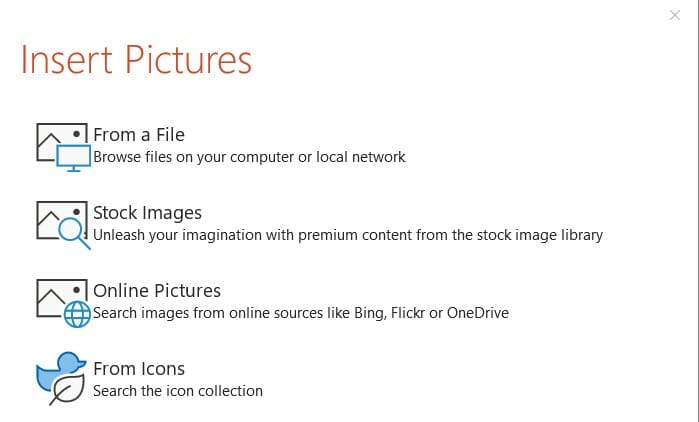
From a File: Click on this option to use a picture from your computer or a local network.
Stock Images: Choose this option when you’d like to select a picture from a curated collection of pictures organized into categories.
Online Pictures: Click on this to browse pictures from online sources, such as Bing, Flickr and One Drive.
From Icons: Here you will find a wide selection of Microsoft Office icons that you can use as backgrounds. Use the categories or the search bar to find the icon you want.
Tip: Edit background icons in PowerPoint
We’ll show you how to scale the size of your icon background and change its color.
Scale your icon background
1. Right-click the icon and select Format Background from the drop-down menu.
2. Now enter the percentage you want to scale the icon in Offset left/Offset right/Offset top/Offset bottom.
Warning: The icon may become distorted through scaling!
Change the color of your icon background
- From the Format Background pane, click the picture icon in the top row and then select Picture Color > Recolor.
2. You’ll now see a preview of your background icon in assorted colors. Select the color you want.
Use the slide master to set a picture as the background for the entire presentation
You can also set a picture as a PowerPoint background for your entire presentation:
1. Click on the View Select Slide Master from the Master Views group.
2. Click Background Styles and select Format Background….
3. In the Format Background pane, click Picture or text fill.
4. Select the picture you want to use for your background by clicking Insert… under Picture source.
Edit and scale picture backgrounds in PowerPoint
A customized background looks professional, sophisticated and leaves a lasting impression on your audience. Here’s how to edit your picture backgrounds:
1. Right-click on the picture background. This will open the Format Background pane.
2. Use the Offset settings (as explained in Scale your icon background) to scale your picture.
3. Change the transparency of your picture by using the Transparency slider.
4. Click the Tile picture as texture box to insert multiple, consecutive copies of your background picture.
5. To add effects to your background, click the Effects icon next to the paint bucket icon in the top row of the Format Background pane. Double-click your background picture to open the Artistic Effects option. Click the box next to Artistic Effects to see the various effect templates you can apply to your background picture. Select the effect you want to apply to your background.
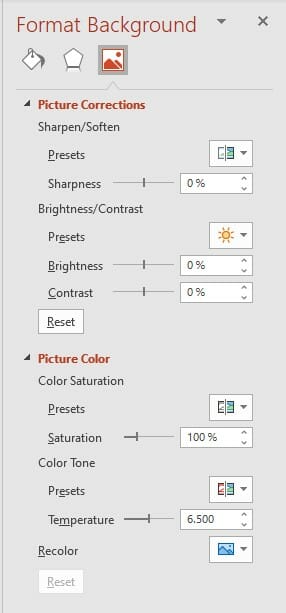
6. You can make further edits by selecting the Picture icon in the Format Background pane. Click Picture Corrections to manually change the sharpness, contrast and brightness of the image by using the sliders or specifying a percentage. Click Picture Color to adjust Color Saturation or Recolor the picture.
Add a watermark to a slide background
PowerPoint makes it easy to add a company logo or another watermark on your PowerPoint background. This is especially useful for business presentations and intellectual property rights. This is how you do it:
1. Click on View and select Slide Master in the Master Views group.
2. Select all the slide layouts that you want to add a watermark to (e.g., a logo) from the thumbnail pane on the left.
3. Right-click on the desired slide and select Format Background… to open the Format Background pane
4. From the Fill list (paint bucket icon), select Picture or texture fill.
5. Click on Insert under Image Source to select your watermark.
6. Use the Transparency slider to adjust the contrast of your watermark.

7. To add the watermark to all your slides, select Apply to All at the bottom of the pane.
8. Click Close Master View to save your changes.
Remove and hide pictures from backgrounds
Are you not happy with the PowerPoint background picture you chose and want to remove it? No problem; just follow the instructions below:
1. Go to the slide with the background picture you want to remove.
2. Click the Design tab and select Format Background.
3. Select Solid fill from the Format Background pane. Click on the arrow to the right of Color and select white.
4. Click Apply to All to remove the background picture on every slide.
5. To hide the PowerPoint background for individual slides only, go to the corresponding slide, click on Format Background in the Design tab and select Hide background graphics from the right-hand pane.
Tip: How to make effective use of backgrounds for your business
A slide background isn’t just decoration. It can be used to support your messages and presentation goals. Here are two ways you can use a PowerPoint background more effectively.
Transparent background images: Optimize readability of texts and evoke emotions with the reveal technique
Slide design is moving further and further away from pure text. Vivid images and graphics are becoming essential for their ability to convey emotions to an audience. Combining transparent images with text is really effective. Read on to learn how to create and leverage them in your presentations. You can also find more info about transparent images here.
1. Once you’ve chosen your background picture, open the Format Background pane (see tutorials above).
2. Adjust the transparency of your background picture using the slider.
3. Now it’s time to use the Reveal effect. This is the perfect effect to highlight your information. It’s great for presenting innovations or changes, substantiating ideas and presenting outlooks. You can create the effect in three simple steps.
Step 1: Select a picture and text for your reveal
- Insert the picture as your PowerPoint background using the above tutorial.
- Now go to the Insert tab and click Text Box.

- Use the corner points to size and drag your text box.
- Enter your text.
Step 2: Cover the image with a transparent rectangle
- Go to Insert > Shapes to draw a rectangle.

- Right-click the rectangle and select Format Shape… form the drop-down menu.
- Select Fill (paint bucket icon) > Solid fill from the Format Shape pane. Choose a fill color of your choice.
- Now use the slider to set the transparency.
Step 3: Enable animation
In this step, you’ll set the reveal of both the picture and text message.
- Select the rectangle and open the Animations tab. Here you’ll find a catalogue of animations.
- Scroll down the bar and select the command More Motion Paths > Lines Curves > Arc Left. Confirm with OK.

- You’ll now see a green arrow as the start point and a red arrow as the end point of the animation on the slide.
- Drag the red end point to the desired position.
Align the background picture with the text color: Combine emotions and facts
Images that fill slides are absolutely on trend in today’s PowerPoint presentations. But images should never interfere with the readability of the text. Here are five ways to ensure your audience can read your text without compromising the picture’s emotional impact.
Option 1: Using grayscale to make colored text more legible
Grayscale pictures are particularly effective in enhancing the contrast between text and image.
- Insert your PowerPoint background picture by going to Insert > Pictures.
- Right-click the picture and select Format Picture…. From the Adjust group in the top ribbon, select Color.
- Go to Recolor and select Grayscale.


Option 2: Use light gray coloring to enhance the contrast between text and background
A background color in a light shade (light gray) helps create a great contrast between text and image.
- Insert your PowerPoint background picture.
- Right-click on the picture to open the Format Picture tab. Select Color.
- Go to Recolor and click White, Background color 2 Light.
Option 3: Use a light font on a dark picture to accentuate text
Instead of brightening your PowerPoint background image, you can darken it and use a light font. A semi-transparent rectangle works better for this than the PowerPoint picture correction options.
- Go to Insert > Shapes to draw a rectangle.
- Right-click the rectangle and open the Format Shape pane.
- Select Fill (paint bucket icon) and Solid color fill. Select a dark color of your choice.
- Use the slider to adjust the transparency.

Option 4: Use blurring to create a striking contrast with text
- Insert your PowerPoint background picture.
- Right-click the image and open the Picture Format tab. Go to Artistic Effects in the Adjust group. Click Blur.

Option 5: Display text messages clearly with picture transparency
- Click on the picture and switch to the Picture Format tab. Go to the Adjust group and click Transparency.
- Now select Picture Transparency Options… to open the Format Picture pane on the right.
- Adjust the transparency of the picture by moving slider under Picture Transparency.
Design Trend 2023: Dark Backgrounds on Slides
If you decide to use a coloured background, black or a darker blue are suitable colours for your slides. There are several reasons for using a dark background in your presentation. We show three of them:
#1: Dark backgrounds stand out from standard white designs and look modern, elegant and classy. Example:

#2: Black contrasts with brighter colours and can therefore make certain elements on your slides stand out. Further, the content in the foreground of your slides stands out better. Example:

#3: Especially dark blue is effective and gives a sense of security. You can use this effect and take advantage of it in keynote and executive presentations and in infographics. Examples:

When is it best not to use dark backgrounds?
Even though a dark background can look very elegant, it is important that you adjust the background colour of your slides according to the situation, if necessary.
If you plan on conveying a lot of data and facts on your slides, it is better to use a lighter background, for example. This will make it easier for your audience to see all the data at a glance.

You will find many more inspirations for dark foil backgrounds in our references.
Add more individuality to your presentation: Design your own slide background
Are PowerPoint’s background suggestions not what you’re looking for? Do you want to customize your background? Then why not design your own slide background? You can find a variety of design tips to help you in our blog.
Use professionally designed PowerPoint background templates from PresentationLoad!
Are you looking for backgrounds that catch the eye while maintaining a professional design? Or do you want to save time by not designing your own background but still add a professional PowerPoint background to your presentation? No problem, feel free to browse our shop.
We have, for example, these backgrounds for you:
Conclusion: PowerPoint backgrounds: The right background makes for a successful presentation
Choose the right PowerPoint background for your PowerPoint presentation. The background is like the cherry on top of your presentation. When used strategically and chosen wisely, the PowerPoint background can support your statements and reinforce your objectives.
Always make sure to select the presentation background that complements your content. A background that doesn’t harmonize with the text can quickly appear unprofessional and poorly thought out. Fortunately, PowerPoint offers numerous design options to help you. Use these tools strategically, and nothing will stand in the way of your individual slide background!
Looking for inspiration for possible PowerPoint backgrounds or searching for professional PowerPoint background templates for your business? Feel free to explore PresentationLoad or contact us at [email protected] if you need assistance. We’re here to help!
You might also be interested in these articles:


