Insert Videos into PowerPoint: Tutorial & 4 Creative Tips
Along with images and GIFs, videos are some of the most used information media of our generation. In 2023, you won’t only find them on YouTube, TikTok and Instagram – this stylistic device is also indispensable in PowerPoint presentations.
Videos can provide important visual anchors and add dynamism to your presentation. We’ll show you how to insert, playback, and edit a video in PowerPoint in this article.
Linking videos vs. embedding videos into PowerPoint
PowerPoint offers you two options for inserting a video into PowerPoint. Both options support the following file formats (as of Microsoft PowerPoint Office 365):
- Windows video file (ASF, AVI)
- MP4 video file (MP4, M4V, MOV)
- Movie file (MPG, MPEG)
- Adobe Flash Media (SWF)
- Windows Media video file (WMV)
Depending on your PowerPoint version, you can embed videos in PowerPoint or simply insert a link to a video saved on your computer.
With embedded videos, the video is saved directly with your presentation, greatly increasing the size of your PowerPoint file. A linked video does not appear directly as a video file in your PowerPoint presentation and thus does not require extra storage space
Advantages and disadvantages of linked vs. embedded videos
Advantages:
Linked Videos:
Embedded Video:
Disadvantages:
Linked Videos
Embedded videos
Insert videos into PowerPoint: Tutorial
So, you’ve decided to use a video in PowerPoint to support your statements and add dynamism to your presentation? Read on to learn how to insert videos in PowerPoint.
There are several options for embedding or inserting videos into PowerPoint:
- Videos from your hard drive
- YouTube videos
- Videos from other online platforms
- Stock videos
Insert videos from your computer into PowerPoint
PowerPoint supports virtually all popular video formats, meaning you can add videos to your presentation just as easily as images.
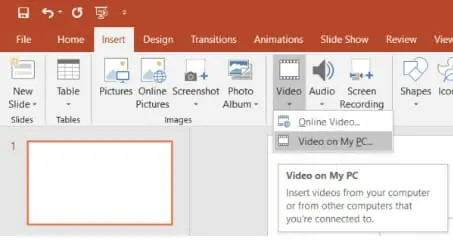
1. Go to Insert and click Video to open the drop-down menu. Depending on your PowerPoint version, choose Video on My Computer, Video on My PC or This Device.
2. In the dialog box, go to the folder containing your saved video, click it and select Insert.
Insert YouTube videos into PowerPoint

1. Go to YouTube. Click the Share button on your video’s page, then Copy.

2. Go to your slide and select Insert > Video. Depending on your PowerPoint version, click Online Videos… or Video from Web Site. Right-click the address bar and select Paste. Click Insert.


3. Resize your video to fit your layout and design. You can also make it fit the full width of the screen to display it in full-screen mode.
It’s important to note that the Online Video button is not available in PowerPoint 2010. Here you need to use the following option: Go to Slide Show > From Current Slide to view and play the embedded video.
Insert videos into PowerPoint using the embed code
Videos can be inserted from any other online sources. To do this, you need the videos embed code. This is a short HTML code that you can display on most video platforms (YouTube, Vimeo and co.) via a button. Follow these instructions to insert a video using an embed code:
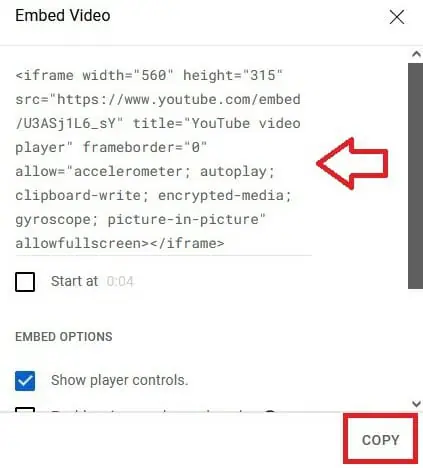
1. Find the embed code. On YouTube, you can find it by selecting the Share button and then clicking Embed. In the window that opens, you’ll see the embed code. Select Copy.

2. Now select the slide where you want the video to appear. On the blank slide you will see six icons. Select the movie icon.

3. Go to Insert > Video. Paste the embed code in the online video address bar and select Insert (newer PPT versions). Or select From a Video Embed Code box and click the arrow on the right (PPT 2016).
4. You can scale now scale your video, if necessary (see Editing videos in PowerPoint).
Use stock videos
New! Windows and Mac users with the Microsoft Office 365 version have access to a wide range of stock videos. To do this, go to Insert > Video > Stock Videos. Choose the video you want from the library of videos and click Insert.
You can find more information here.
Further actions with PowerPoint videos
Play PowerPoint videos automatically or loop videos
When presenting in Slide Show View or Presenter View, the video will play automatically when you land on its slide. But you can choose to automatically play your video as soon as you start the slide or manually play it by clicking on settings. Here’s how:
1. Click on your video to open the Playback tab.
2. Click the down arrow in the box next to Start to open the drop-down menu.

3. You’ll now see three options for playing your video. Select your desired option.
- In Click Sequence: The video will play when you click anywhere on the slide or press any key that advances to the next step.
- Automatically: The video will play automatically when you arrive at the slide.
- When Clicked On: The video will only play when clicked on.
4. To loop your video, tick the Loop until Stopped box. The video will play repeatedly until you move to another slide or pause it.

Problems playing videos
Despite the right settings and codes, you may encounter unexpected problems when playing a video. These problems are often related to your graphics card – especially when the video is very large and has a high resolution (Full HD, 4K). Here there are two solutions that we recommend:
Compress media size and resolution PowerPoint videos
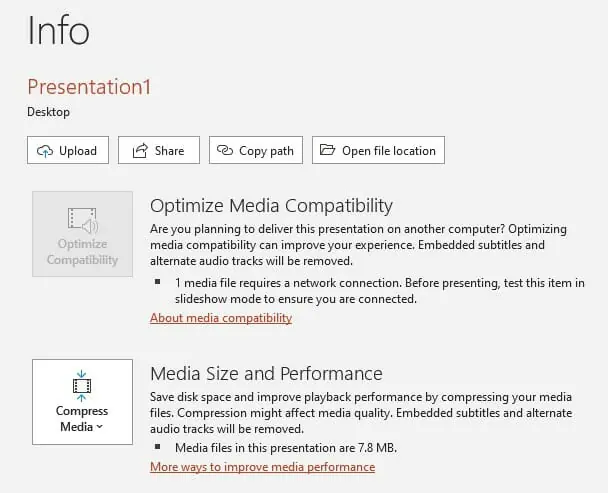
Go to File > Info and select Compress Media from the Media Size and Performance area. Here you can reduce the resolution of your video and save disk space at the same time. This function can only be found in the newer PowerPoint versions.
Use the MPG4 format
We’ve had the best experience using mp4 videos. Make sure your resolution isn’t higher than 1920 × 1080 pixels and that you’re using a compressed video format. The display device should be able to handle a physical resolution of 1920 × 1080 pixels. This is the case for most current devices (full HD).
Disable hardware graphics acceleration
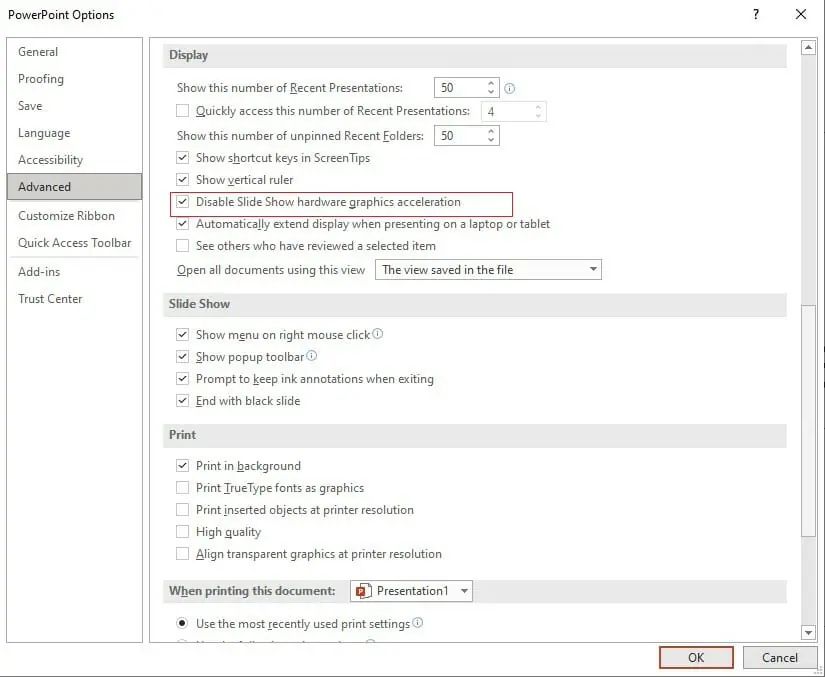
The hardware graphics acceleration setting can affect the performance of your video. Go to File > Options > Advanced and check the box next to Disable Hardware Acceleration or Disable Slide Show hardware graphics acceleration to turn off acceleration. Then test whether your video plays more smoothly in your presentation.
Pro tip to avoid problems with videos
As a rule, try to avoid embedding videos in 4K resolution or HD videos with more than 25 frames per second in PowerPoint. Many office computer graphics cards are not designed for this and quickly reach their performance limits. As a result, your video may not play smoothly, the playback may lag, or your PowerPoint presentation may crash completely.
Add image previews for your PowerPoint videos
Not happy with the preview image of your video? No problem, with the following steps you can set a new start image.
1. Click your video to open Video Format tab.

2. Select Poster Frame from the Adjust group.

3. Select Image from File from the drop-down menu.
4. This will open a window with several options: From a File, Stock Images, Online Pictures and From Icons.
5. Select your source. For the online pictures and icons option, browse the selection and click Insert to select your image.
To return to the original image, click on your video, go to Video Format > Poster Frame > Reset.
Edit videos in PowerPoint
PowerPoint offers you the possibility to edit your inserted video. Here are your options:
Scale video: Click on the video. Circles will appear along the edge of the video. Click on one of these circles, hold down the mouse button, and drag the video to the desired size. To avoid distortion when scaling, right-click on the video. Select Format Video to open a window on the right. Select the Size & Properties option (second icon from the right). Change the numbers for Height and Width and PowerPoint will scale your video accordingly.

Add bookmarks: Bookmarks are useful when you only want to show parts of your video. To do this, click your video, go to the Playback tab and select Add Bookmark.

Trim video: To trim your video, click your video, go to the Playback tab and select the Trim Video option.

Set fade-in/fade-out duration: You can decide how long your video fades in or out. Select your video, go to the Playback tab and set the number of Fade In/ Fade Out seconds under Fade Duration.

Adjust the volume: Click your video, go to the Playback tab and select the Volume option. You can choose between low, medium, high and mute.

Make your PowerPoint videos stand out: 4 creative ideas
Vertical videos
Until recently, vertical videos in presentations were considered unprofessional and basically a faux pas. These videos don’t align with the horizontal orientation of normal screens and consequently, suffer from poor visuals and unattractive black bars on the sides. Over the last few years, smartphones and social media apps like Snapchat and Instagram have changed user behavior, making vertical videos fashionable.
Companies that want to cultivate a fresh brand image and appeal to younger target groups should jump on this trend.
Advantages of vertical videos
Because young people have grown up with social media and smartphones, vertical videos resonate better with younger audiences. Vertical videos are smartphone friendly, making them more suitable for mobile user groups and providing companies with even more ways to reach their audience. What’s more, vertical videos are persuasive and authentic. The story format found on many social media platforms has a more direct and honest effect on young people than classic videos.
Vertical videos also appear more innovative than horizontal videos and because of this, are more likely to grab the average audience’s attention.
Geotags, augmented reality content, etc., just work and look better in vertical videos. That’s partly because the same target groups that use these technologies use vertical videos.

Although there are some problems with vertical videos on horizontal screens, they can be skillfully showcased in classic, horizontal presentations. All they need is the with the proper slide structure. For example, you can put a vertical video on one side of the slide and text on the other. This division allows you to avoid unsightly black bars and present more information at the same time.

Not for every target group
Despite the many advantages of vertical videos, it’s not time to completely throw horizontal videos out the window. We know that younger groups in particular respond positively to vertical videos. But older generations might quickly feel put off if you insert a vertical video into PowerPoint. That’s why companies and presenters need to identify their target audience, and then create an appropriate media strategy. This is essential to guarantee successful public relations.
If you would like to delve further into the topic of vertical videos, we recommend this great read from Creative Market.
Change videos into PowerPoint shapes
This option needs just a few clicks:
1. Click on your video to open the Video Format tab.
2. Select Video Shape and choose the shape you want.

3. There are numerous shapes to choose from. You can change the shape of your video into a circle, a speech bubble or even a diamond.

Make your slide look like a flat screen
Turn your PowerPoint slide into a virtual flat screen that plays your video. This is perfect for product presentations or company/brand image videos. This is how it works:
1. In the Video Format tab, select Monitor, Gray under Video Styles.
2. Right-click the video, select Format Video and set the 3D rotation as you wish.

Turn videos into black and white movies
Here’s how to make your video look like an old black-and-white movie using a color effect:
1. Select Color from the Video Format tab.
2. Choose Grayscale to make your video look like a black-and-white movie.

More effects and tools
Select the video and go to the Adjust group in the Video Format tab. There you will find the following options:
- Corrections: Here you can adjust the brightness and contrast.
- Color: Changes the color scheme of the video (e.g., grayscale).
- Poster Frame: Set the preview image for the video. Clicking on the image will then play the video.
- You can also crop or frame your video in the Video Format tab.
Using videos as backgrounds
You can insert videos into the PowerPoint Slide Master (in the View tab) as backgrounds. You can also overlay content on a slide over the video so that it remains in the background. Keep in mind that you can’t play a video across more than one slide in PowerPoint without a workaround. So, if you use a video as a repeating background, it will play from the beginning of each slide.
Insert videos into PowerPoint: Enrich your presentation!
Videos allow you to focus your audience’s attention to specific areas of your presentation. Many presentation slides are too text-heavy while some content can’t be optimally displayed on static PowerPoint slides. A video can support you when showing certain processes and changes, like financial growth. A short intro video to your company presentation will grab your audience and pique their interest in your presentation.
Videos create variety and break up the monotony of conventional slide presentations. Adding visual stimuli throughout your presentation is a great way to hold your audience’s attention, especially over a longer period.
A video creates new excitement, can vividly underscore your message and will stick with your audience long after the presentation is finished. Videos have the power to create strong emotions and deeper insights than pure text content. This is true for digital content marketing and, of course, presentations.
Need help inserting videos or looking for general advice for your PowerPoint presentation? Then get in touch with us at info@presentationload.com. We’re here to help!
Are you looking for visually supportive and professionally designed slide templates? Feel free to have a look around our store. Here we have numerous slides prepared for you to download on a wide variety of (business) topics. Take a look today! ► To the store


