Hotkeys and Tips for Navigating Through Your PowerPoint Presentation – Part 1
The more confidently you present, the more you can focus on your content and keep your audience captivated. In this blog post, you can learn valuable advice for guiding your listeners through your PowerPoint presentation.
You are probably familiar with some of the tips from this post, but we have some new practices which can certainly benefit you in your next presentation. Some tips may not seem relevant at first, but if you’re running your presentation with a wireless mouse, it can be extremely useful to know how to return to the first slide with just one click.
Part 1 – From the Start of the Presentation to Helpful Tools
1.1) Using shortcuts during the presentation
1.2.) Accessing Slide Show Help with the F1 key
1.3.) Hiding the dialog menu and context menu
1.4.) Switching programs during the presentation
1.5.) Working with hyperlinks
1.6.) Inserting action buttons
Upcoming Posts:
Part 2 – Setting up Your Own Navigation Toolbar and Screen Timeout
2.1.) Putting together your own navigation toolbars
2.2.) Practical use of the slide master in the navigation toolbar
2.3.) Displaying a screen timeout
Part 3 – Orientation – for the Speakers and the Audience
3.1.) Installing chapter slides for audience orientation
3.2.) “Keeping an eye” on your agenda
3.3.) Working with two screens
Part 4 – Presenter View and the Difference from PowerPoint 2013/16
4.1.) Using Presenter View of PPT 2013/16
4.2.) What is new or different in the newer versions
4.3.) More tips & tricks
1.) Using shortcuts during the presentation
With some commands, you can quickly perform actions before and during the presentation.
There are many ways to jump back and forth in the presentation. Make it a habit to always perform the same key actions.
By pressing the left mouse button, the ENTER key and the spacebar, your presentation continues to the next slide. Alternatively, you can press the Down Arrow or Page Down. Similarly, the Up Arrow or Page Up keys go back a slide.
Also, you can (carefully) scroll with the mouse wheel in the appropriate direction, however, most of the time it doesn’t work. (Either the presenter isn’t in front of the laptop at the moment or he/ she rotates the wheel too far instead of in small increments. All these mishaps can give an unprofessional impression.) The N (next), P (previous) or the backspace key (backward) work just as well for navigation.
If you give a lot of presentations, you should consider purchasing a “Presenter” that has many wireless features, so you don’t have to stand by the laptop or even use the mouse. Some of these devices also have quite a big range so you can present near or even behind the audience. (Advantages: you can see from the audience’s perspective and no longer constrained to stand at the front. You can better assess and change the atmosphere).
With HOME, you can always go back to the first slide. Once there, you can press and hold both mouse buttons for 1-2 seconds, and it will start the slide show.
Press the END key to go to the end of the presentation.
You can also go directly to a specific slide in your presentation by typing the slide number and hitting ENTER. Disadvantage: You need to know the slide number. It is a lot easier to go to slide 1 with this method, but if you enter a number that is higher than the number of your slides, it will take you to the last slide.
By pressing Ctrl + S, all slide numbers will be displayed in a separate menu where you can select the one you want. Press ESC to close the menu. These shortcuts, as well as other features, are more or less identical in PowerPoint 2016. When there are any differences regarding this issue, you can find out more information about Presenter View in newer versions of PowerPoint in Part 4 of this blog series.
Sometimes the pointer can interfere on the slide. With the 
Now and then unplanned interruptions will occur in the middle of the presentation. So the audience doesn’t get distracted by the current slide, you can press the 
In other cases, this may not be the best option, because you might want to work with something like an interactive whiteboard. Therefore, you can switch the screen to black by pressing the 
Another solution is the 
For example, if you hide a slide in your presentation (in the navigation pane, on the slide right click> Hide Slide), then this will be omitted from presentation mode. But knowing there might be specific questions concerning that slide (e.g. budgets, etc.), you can be ready to show it. Just press the H key on the slide and the hidden one will appear.
2.) Accessing Slide Show Help with the F1 key
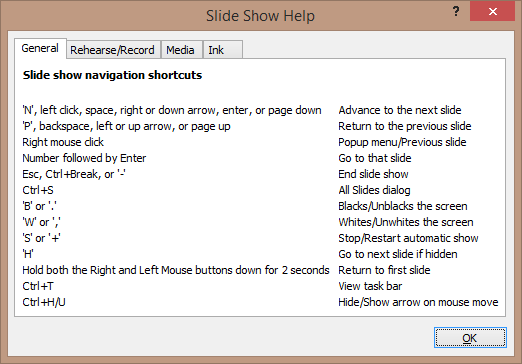
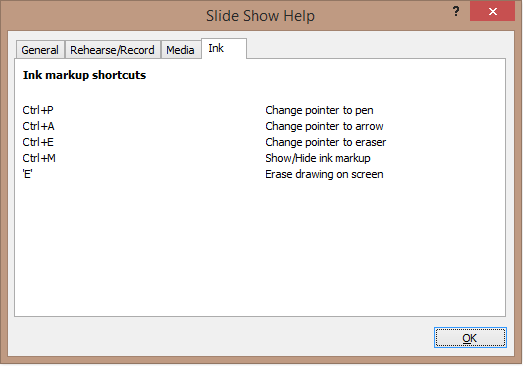
Since you don’t frequently use all the shortcuts, you will probably forget a few. PowerPoint provides a help menu by default.
In presentation mode, you can show the standard help menu by pressing 
(Find out more about the PowerPoint 2016 Slide Show Help in part 4.)
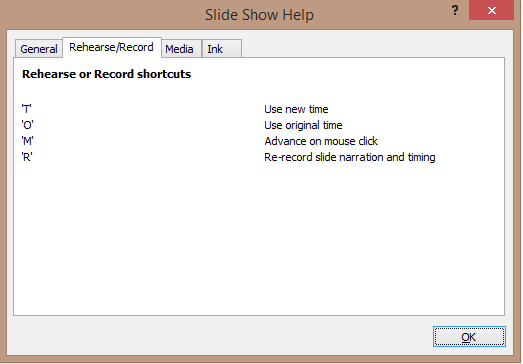
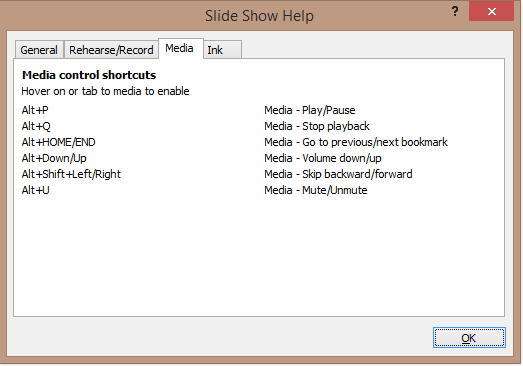
If you click on the other three tabs in the top menu, additional options/ aids are offered. You should test them out at some point before applying them later.
3.) Hiding the dialog menu and context menu
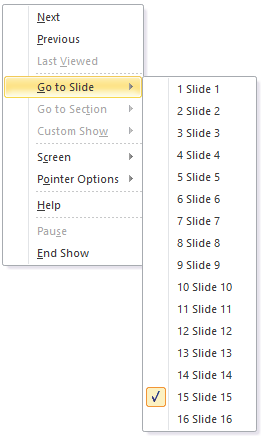
You can right click the mouse and a context menu with similar functions will open. Here you can click on some of the options shown above (example: right click and select Go to Slide: 13).
In the lower left corner of your screen, an additional small menu box appears when you drag the cursor near it. You can also go back and forth between slides, activate the mouse pen or open the context menu shown above.
4.) Switching programs during the presentation
For complex topics, you might have to switch to other programs like Excel or Word several times. There are many possibilities.
The command Ctrl + t will activate the taskbar at the bottom of the screen in the slide show. There you can select the application that you need at that moment. When you have completed your activities in this program, you can either close or minimize it and get back to your presentation. The taskbar can be hidden again by clicking anywhere outside the taskbar.
Another possibility is the 
the next program or by clicking on the application. After you have completed your tasks in another program, you can perform this key combination again to return to your PowerPoint presentation.
Tip: before beginning your presentation, you should completely close all unnecessary programs, so it doesn’t expose confidential or unpublished information to the entire hall nor display any currently open web pages.
TIP: In training workshops, it is very common to show a slide, but want to add changes or additions directly to it. This is very simple:
Stay in presentation mode.
Press ALT + Tab and move to your PowerPoint file (the current slide will be displayed).
Make any corrections.
ALT + TAB will bring you back to the slide show with the updated corrections.
5.) Working with hyperlinks
You are probably familiar with hyperlinks from the Internet and many software products, e.g. www.presentationload.de. This application is also available in PowerPoint.
The following, however, should be noted:
- The links can only be activated in presentation mode.
- The address should be written the way it appears on the web (domain name) to be directly converted to a hyperlink.
- The hyperlink is created only after pressing ENTER after typing the address. The entire link is underlined by default.
- In presentation mode, you can always tell whether it is just plain text or a hyperlink – with a hyperlink, it becomes an interactive button and the cursor changes into a hand
A) Here, ENTER wasn’t pressed after writing the text. Therefore, it won’t work as a link in presentation mode.
B) Here, it is plain to see that this is a hyperlink because it is underlined.
C) By moving the cursor over the link, it changes into a hand and shows the full domain underneath.
By clicking the link, you will immediately jump to its address. If you don’t have a mouse, you can move to each link with the TAB key and then hit ENTER. The hyperlink currently selected will have a dashed border around it.
Changing the color of hyperlinks/ text
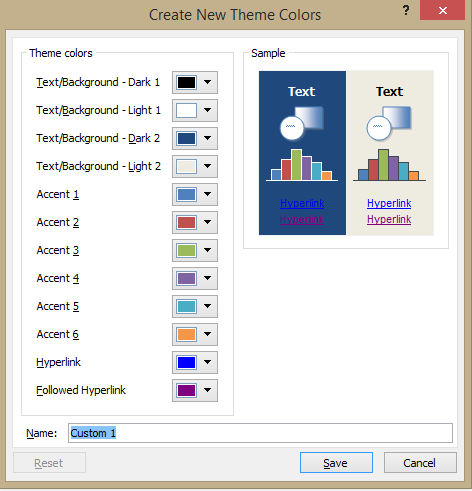
Select the hyperlink and at the top, go to Design> Colors> Create New Theme Colors. A menu will appear with the option, Hyperlink. From there, you can determine the color as well as the fade color after clicking the link. Give your new theme color a name and save it.
The color of the hyperlink depends on the theme color, and when you insert slides into a different presentation, the links could be displayed in a different color.
Removing the underline from the link.
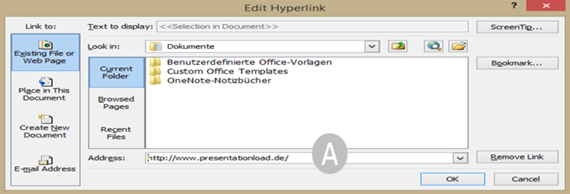
If you don’t want the link underlined, you can do this with a little trick. (Please note: you must create a new text box within the content region to place the link.) Right click on the address to open the drop-down menu and select Remove Hyperlink. Then right click on the frame of the entire text box and select Hyperlink. Enter the web address in the field below. Even though the link isn’t underlined, it is still active and can connect you to the site by clicking anywhere within the box.
You have another possibility when the hyperlink is within the text body.
Place a rectangle over part of the text (like the example above). Go to Format Shape> Fill> Solid Fill> 100% transparency. Then, select Line Color> No line. The text should now be visible through the shape. If you go into presentation mode and drag the mouse over the text, it will turn into a hand over the uncovered part signifying the hyperlink. Your audience won’t see any hyperlink at first, which is helpful for large textual content.
NOTE: In earlier versions of PowerPoint, going to Format Shape> No Fill, the link couldn’t be activated because the fill was not clickable, so it is always better to choose 100% transparency.
This invisible technique can be applied in a variety of ways. For details see the upcoming blog articles.
But first, two important points which we will discuss in more detail in this blog series:
- Assuming you have already inserted a link in the current slide, you can use it to skip to another slide within the same presentation. Another way is to right click> Last Viewed, otherwise, you will just go back to the starting slide.
- to jump to another application or a web page, you have a variety of ways to go back.
Working with the ScreenTip
When you have inserted a hyperlink to an external website, by default, you will see the address you specified (right click> Hyperlink) shown in presentation mode when the mouse (hand) is over it. In this example below, the link has been attached to the added arrow shape (seen in B).
A) Right click on the arrow and select Hyperlink. Type the address into the bottom address field.
B) The text will be displayed exactly as it’s been typed when you hover the mouse over the arrow in presentation mode.
In some cases (e.g. for privacy reasons) the link needs to be hidden. You can quickly manage this by going to Insert> Hyperlink> Screentip. Enter your own text into the field.
A) Here we see the ScreenTip button.
B) In this example, nothing has been typed into the field; only the space bar has been pressed. In presentation mode, you will only see this little square when the cursor hovers over it.
C) You can also enter an individual longer text into the Screentip field.
Absolute and Relative Hyperlinks
Contrary to earlier definitions, “link” and “hyperlink” now mean the same thing. Anyone who has knows a bit more with links, however, knows the difference. In PowerPoint, you have the option of using a relative or an absolute hyperlink.
If you want to refer, for example, to another document that is in the same folder as your presentation, you just need a relative hyperlink containing the file name only. The rest of the path is identical in both documents.
With an absolute hyperlink, the full path of the data directory of the “root directory” or network server is given, for example:
C:\\Users\username\Documents\PRESENTATIONLOAD\PresentationLoad\Filename.pptx
Absolute hyperlinks are always handy when you want to link saved documents within a company in a variety of file directories.
The relative hyperlink by contrast is only useful for documents in the same folder (of the presentation).
It is good to be prepared to burn the hyperlinks included in presentation to a CD or copy them to a USB stick. In your company, the configured (absolute) hyperlinks all function properly. However, when you try to play the presentation on an external computer, none of the links will work, because the directory structure on that system will be completely different and your linked files are not automatically copied.
If you want to work on an external system with your links, continue reading:
The safest way to solve this problem is by first putting all documents belonging to the presentation in the same directory, determining your links, and then transferring these files together with the presentation. On the external system, you have to maintain this state or you need to update the links, otherwise it won’t work.
Nevertheless, it still may happen that configured links on a remote system will not work. Therefore you should always test them on that system beforehand to fix any issues prior to the presentation.
6.) Inserting action buttons
Regardless of the options mentioned above, you can also use buttons that lead to other applications in the presentation known as action buttons. These shapes are already standard in PowerPoint and are listed below.
Check out Part 2 – Hotkeys and Tips for Navigating Through Your PowerPoint Presentation
