PowerPoint Arrows in Presentations: Curved Arrows, Circle Arrows and More
Arrows are great for illustrating connections, progressions and directions quickly and easily. They add zest to the visual design of PowerPoint presentations and, thanks to their visual language, reduce unnecessary text on slides.
PowerPoint arrows offer a wide range of possibilities; you can visualize loops with curved arrows, explain processes with progress arrows or grab your audience’s attention with animated arrows. Keep reading to find out how.
Insert PowerPoint arrows: here’s how
The classic arrow icon in PowerPoint is divided into two groups: block arrows and line arrows. These two classic shapes can be used in so many different ways. Here’s how to insert PPT arrows, step by step:
1. Click on Shapes on the Insert tab.

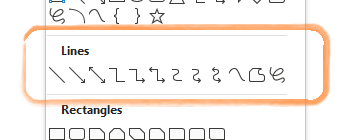
2. You’ll see a large selection of arrows in the two subcategories, Lines and Block Arrows. Click on the arrow shape you want to use.
3. To insert your arrow, click on your slide. Drag the arrow at the corners to resize it and move it to the desired location.
4. To rotate the arrow, click on it and grab the small circle icon in the center above the arrow. Now you can turn the arrow shape in both directions.

Edit and customize your PowerPoint arrows
PowerPoint provides many ways to customize your PPT arrow shapes. Right-click on the arrow and select Format Shape… from the drop-down menu.

You’ll now see the Format Shape pane on the right-hand side of your slide. Here you can customize your arrow under Fill & Line, Effects and Size & Properties.
You can also quickly and easily reuse all arrow shapes anywhere in your presentation by right-clicking your PPT arrow and selecting Copy from the drop-down menu. To insert the arrow shape anywhere in your presentation, even on other slides, right-click the slide and select Paste.
Create curved PowerPoint arrows
Curved arrows are dynamic alternatives to classic arrows. To use them, go to Insert > Shapes and select Arc from the Basic Shapes category.

Inserting the arc with the Shift key pressed allows you to scale its size directly. The yellow dots enable you to manually adjust the length of the arc all the way to a full circle.

Curved PowerPoint arrows: customize the arc line and arrowhead
The default line thickness of the arc is quite fine and understated. PowerPoint offers the option to customize both the color scheme and line thickness of your arc:
- Click on your arrow arc.
2. Click the Shape Format tab and select Shape Outline in the Shape Styles group.
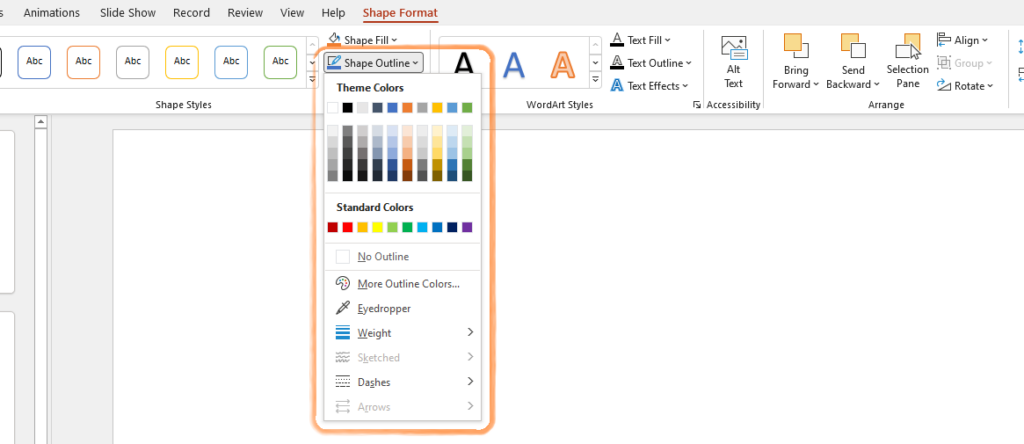
- Here you’ll find a number of design options to choose from. You can change the color, the weight of the line and even the style.
4. At the bottom of the drop-down menu is the Arrows option.
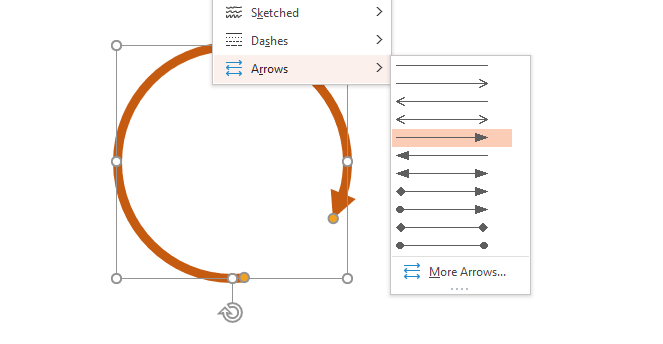
- Here you can select different arrowheads and line ends. Under More Arrows… you’ll find more detailed design options. As usual, you can determine the length of the arrow yourself at any time using the small yellow dots in the arc shape.
Create a loop with PowerPoint arrows
Loops are vivid tools that convey content simply and coherently. Thanks to PowerPoint and its curved arrows, you can easily create your own loop and tailor it to your data. A really useful key combination for this is Ctrl + D to create duplicates (alternatively copy-paste with Ctrl + C and Ctrl + V).

1. The first step is to duplicate your existing arc. Place the duplicate on top of the original so that it’s in the same position.
2. Now you can easily rotate the arrow or manually lengthen or shorten it using the yellow dots. This is how you construct the second segment of the loop.
3. Repeat this process as many times as you need until you have created a complete loop.
How to label arrow loops in PowerPoint
Now that you’ve created your loop, it’s time to fill in the individual sections of your circuit with information. This works best with the use of small labels or text boxes within the loop.

The first step is to make sure there is enough space for the text boxes between two arrow ends. If you need more space, you can shorten the arrows manually using the small yellow dots at the arrowheads. Now you can add labels for the individual segments:
- Go to Insert > Shapes.
2. You’re free to choose here. In our example, we’ve used classic rectangular boxes for the individual sections.

- Click on the shape to add your label.
How to customize your PowerPoint loop
PowerPoint offers many possibilities to design and customize curved arrow loops. Combined with information boxes or other types of labels, loops quickly provide an overview of context and connections. Work processes, causal relationships or other sequences that build on each other can be clearly visualized.

In our example, we played with different design elements:
| Color scheme: | Light blue boxes complement the orange arrows. We recommend the use of complementary colors or gradations of a single color – for example, a light pastel green combined with a strong dark forest green. |
| Border effects: | We placed light shading under the arrows to create a “floating” effect. The blue boxes are virtually unchanged. This is a subtle way to make your loop – and all other curved arrows in PowerPoint – more dynamic. |
| To do this, right-click on the arrow or object you want to format and select Format Shape. In the Format Shape pane to the right of your slide, go to the middle category (Effects). Shadows offers some easy-to-understand options with which you can experiment. | |
| Inner area: | There are various ideas for designing the inside of the curved PowerPoint arrows: An additional pie chart in the center, for example, could fill the space to make the exact length or circumference of individual sections more clearly visible. Other purely design-related possibilities include icons, photos or even company logos in the center of the curved arrows. This is a discreet way to integrate your corporate design into your presentation. |
Loop: Animating curved arrows in PowerPoint
Curved PPT arrows are used to create a simplified visualization of processes, relationships and causal chains. Short animation effects are a great way to bring more attention to your graphic. For example, you can have your loop appear at a specific point or build it up step by step before your audience’s eyes. This last method is particularly effective for emphasizing the idea of a fixed sequence or structure (e.g., in the middle).

You can duplicate all your animations with just a few clicks. Here’s how:
Loop appears as a whole:
- Shift-click all loop components on your slide.
- Click on Group (the individual components will be grouped together as a whole).
- Select the group and go to Animations.
- Choose an appropriate animation (our example: Zoom).
Components emerge one after the other:
- Select the block/text box/arrow that you want to appear first on your slide.
- Go to Animations and select a suitable animation.
- Select the second object to appear and give it an animation. Continue until you have animated all
components - When you now open the slide, the loop will automatically build itself. Go to Animations > Advanced Animation group to set the speed and sequence of the different animations.
Tip: Do you want to control when the next building blocks of the PowerPoint loop appear during your presentation?
It’s easy if you build the arc over several slides:

Create the first “building block” of your loop and complete its design. Duplicate the entire slide (select the slide in the slide overview and click Ctrl + D) and add the next part of the circuit on the new slide. Repeat this process until the loop is closed. During the presentation, you control when you switch to the next slide and how quickly your arc grows. This allows you to first present all the relevant information of each section before you allow the next one to appear.
Emphasize circle arrows with color:
- Select the arrow that you want to add color to.
- In the Animations tab, look for the animation Line Color (or Fill Color) in the Emphasis category.
- After selecting the animation effect, choose the color you want the arrow to change to under Effect Options.
- Now you can determine the length and sequence of the animation in the Timing group.
- Repeat this process with all the objects that you want to highlight with color.
Create more diagrams with PowerPoint arrows: flowcharts
Flowcharts provide a quick overview, particularly when you want to visualize more complex workflows or processes. PowerPoint arrows once again come into play when creating flowcharts.

The connecting arrows are attached to the individual boxes. If you move the text boxes to a different location on the slide, the arrows automatically move with them. Here’s how to insert connecting arrows in PowerPoint.
1. Go to Insert > Shapes.
2. Here you can browse shapes for your text fields. We’ve used blue rectangles in our example.
3. Go back to Shapes and choose the line arrow or other line shape you want to use from the Lines category.
4. Small circles appear at the ends of the lines, which are a kind of anchor. Hold down the mouse button and drag the line arrows across the slide to connect the boxes or text fields you have just inserted. Shift-click each shape, right-click and select Group from the drop-down menu.

The line arrows are now firmly anchored. At the same time, they remain dynamic and drag along everywhere on the slide. In a previous blog post, we’ve already looked at PowerPoint flowcharts in more detail. Feel free to stop by and discover the many design possibilities that PowerPoint already offers out of the box.
Here’s the blog article.
Animate PowerPoint arrows
Using animations in your presentation helps grab your audience’s attention and enhance content significantly. When using arrows, it makes sense to match the direction or length of the individual arrows to the content. PowerPoint offers several ways to animate arrows. Here’s one of them.

To recreate the arrow animation above, follow these steps:
Build an arrow: Our arrow consists of a rectangle and an isosceles triangle. You can find the appropriate options by going to Insert > Shapes.
1. First, insert a rectangle on your slide and then place an isosceles triangle in front of it.

2. Shift-click both shapes. Right-click to open the drop-down menu and select Group.
3. Right-click the shape again and select Format Shape. You can remove the lines of the rectangle and triangle in the Fill & Line tab of the Format Shape pane. This is how the arrow takes on its appearance.
Animate your arrow: Select your newly assembled arrow and go to Animations > Add Animation where you’ll find a variety of animation effects to choose from. We have chosen Lines from the Motion Path category and manually adjusted the direction.

5. Insert another rectangle of the same thickness as the first arrow line. This rectangle will become the growing arrow line in the finished animation. Drag the new rectangle to the correct length.

- The new rectangle should now also be animated. To create the illusion of a growing arrow, we used the Wipe animation effect. You can find this effect under Animation > Add Animation > Entrance.
7. After applying the effect, you can adjust the direction in which the arrow should grow by clicking Effect Options.
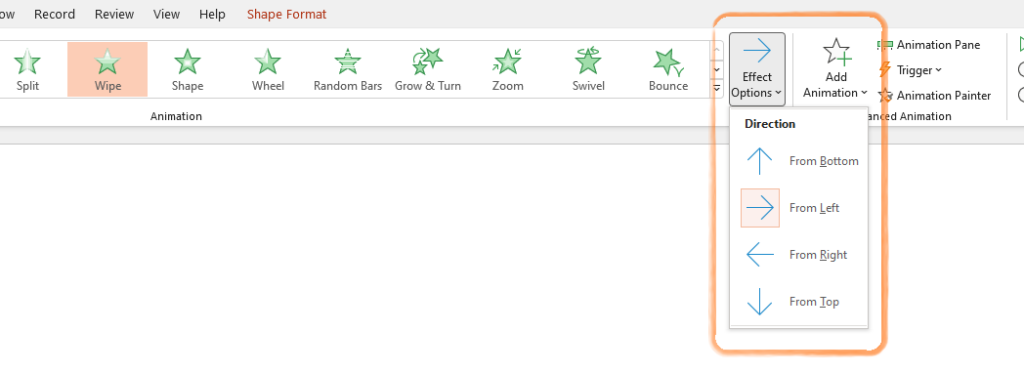
8. In the Timing group or in the Animation Pane, you can make the two animations (Lines and Wipe) start and end at the same time. As a result, the final arrow animation will already be clearly visible.

9. Now you can easily combine the two objects by right-clicking on them and selecting Group and insert the finished arrow animation anywhere in your presentation. If you are not yet satisfied with the timing of the Wipe animation, you can manually adjust this again in the Animation Pane.

Use PowerPoint arrows to create visual appeal or create diagrams
PowerPoint offers many possibilities to use arrows effectively to make complex content more exciting and understandable. Curved arrows quickly become customized pie charts or demonstrative loops. Animated arrows are modern and eye-catching tools to indicate work processes, contexts and directions. In our blog, you’ll find many helpful tips and tricks on the topic, including clear examples and step-by-step tutorials.
As a market-oriented PowerPoint agency, we offer ready-to-use and professionally designed presentation templates, all of which you can adapt to your individual taste or to special specifications. You can find a wide selection of PowerPoint arrow templates in our store. Here’s an overview:
I’d be happy to help you with any problems or questions you may have about PowerPoint or your presentations. Feel free to contact me at [email protected].


