PowerPoint Morph: Slide Transitions With That Wow Effect!
Slide transitions in PowerPoint provide a creative platform to make presentations more exciting and interactive. The PowerPoint Morph effect is a great tool for this. Read on to learn more.
PowerPoint Morph: what is it?
In biology, metamorphosis describes the process of transformation or a change of form. In PowerPoint, morphing can be described as the transformation or smooth transition from one slide to the next. All modern versions of PowerPoint have the Morph feature. PowerPoint is able to recognize objects, their movements and changes on both slides and create a seamless transition.
This results in animation effects that are dynamic and fun. Used to its fullest, Morph can create the illusion of a continuous camera shot that makes a presentation look alive and more modern. Although that may sound like it requires expertise to pull off, using PowerPoint Morph is surprisingly simple. All you need is a starting and target state for your objects, which you can easily design in advance.

PowerPoint Morph now allows you to create animations with just a click and use them as slide transitions. Animations are a great way to visually support content. The right animation can even be used to reinforce key messages.
Note: If you’re looking for other animations or general tips and tricks on PowerPoint animations and their uses, take a look at our blog. (https://www.presentationload.com/blog/powerpoint-animation/)
PowerPoint Morph requirements
PowerPoint Morph is still a relatively new feature in Microsoft’s presentation software. There are specific technical requirements to create and play back Morph effects. Early versions of PowerPoint can play back Morph effects to a limited extent but can’t create them. The earliest versions aren’t capable of rendering the information in a Morph effect and instead, will replace it with a Fade effect in the presentation. In the table below, we’ve listed which PowerPoint versions that support Morph, and those that don’t.
|
PowerPoint version |
Creates Morph effects
|
Plays back Morph effects
| Plays back Fade effect |
|
PowerPoint Office 365 (starting from version 1511)
|
✔️ |
✔️ |
❌ |
|
PowerPoint Office 365 for Mac (starting from version 15.19)
|
✔️ |
✔️ |
❌ |
|
PowerPoint for the web
|
✔️ |
✔️ |
❌ |
|
PowerPoint 2019
|
✔️ |
✔️ |
❌ |
|
PowerPoint 2019 for Mac
|
✔️ |
✔️ |
❌ |
| 1PowerPoint 2016
(click-to-run installation) From version 1511 (Build 16.0.4358.1000) |
❌
|
✔️ |
❌ |
|
1PowerPoint 2016 (Microsoft installer) Starting from build 16.0.4358.1000
|
❌ |
✔️ |
❌ |
|
PowerPoint 2016 for Mac
|
❌ |
❌ |
✔️ |
|
PowerPoint for Android*
|
✔️ |
✔️ |
❌ |
|
PowerPoint for iOS*
|
✔️ |
✔️ |
❌ |
|
PowerPoint Mobile for Windows*
|
✔️ |
✔️ |
❌ |
|
PowerPoint 2013
|
❌ |
❌ |
✔️ |
|
PowerPoint 2011 for Mac
|
❌ |
❌ |
✔️ |
|
PowerPoint 2010
|
❌ |
❌ |
✔️ |
|
PowerPoint 2007
|
❌ |
❌ |
✔️ |
1To play back Morph effects with PowerPoint 2016, you need at least the following Office updates: KB3114971, KB3114961, KB3114958, KB3114859, KB3114535.
*Creating Morph transitions in mobile apps is only possible with a Microsoft 365 subscription.
PowerPoint Morph effect: here’s how
To use the Morph effect as a transition, you’ll need two consecutive slides. When you change slides, objects on the first slide will transform smoothly into “new” objects on the second slide. To perform a complete Morph transition, the selected objects need a starting state (on the first slide) and a target state (on the second slide). The Morphed objects on the second slide are modified duplicates of the original objects from the first slide.
While this may sound complicated, it’s actually really easy. Here’s a step-by-step tutorial in which a rectangle morphs and changes color.
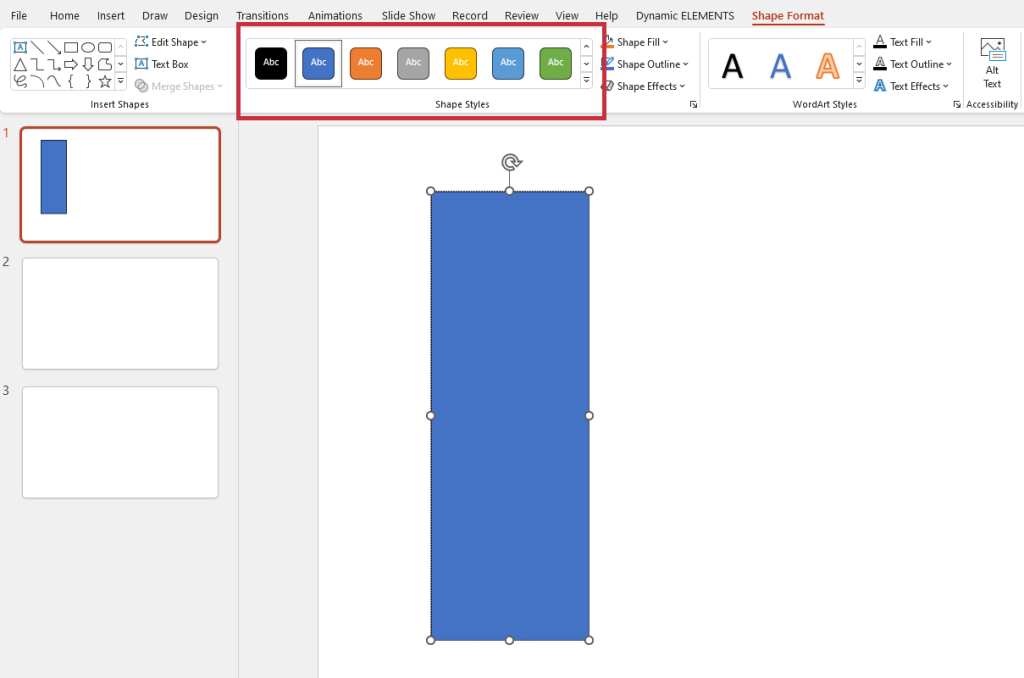
1. Insert an object: Go to Insert > Shapes. We’ve selected a rectangle and placed it on the slide.

2. Choose a color: The Shape Format tab will now open in the top ribbon. Here you can select, among other things, the (starting) color of your object. You can further design the (starting) object any way you like.

- Duplicate your slide: Click the first slide in the thumbnail pane on the left by pressing CTRL + D or right-clicking it and selecting Duplicate Slide. Now you have the starting and target slides for your Morph effect.

4. Design your target slide: The second slide of the morph transition represents the final stage of your animation. Use the mouse to distort the shape of the rectangle, change its position, or recolor it as you like (right-click > Format Shape).

5. Morph effect: Now go to the Transitions tab and make sure that the second slide or target slide is selected. Click Morph in the selection pane.

PowerPoint will now render your custom Morph animation. Go back to Transitions and click on Preview to make sure that the transition is working properly.
Once you understand the principle behind PowerPoint Morph, you’ll have an almost infinite number of ways to create exciting animations and slide transitions. Get creative with shapes, images and text to create your own personal, interactive presentation using the PowerPoint Morph effect!
Morphing text in PowerPoint
In order for the Morph effect to work on text or individual letters, you need to enable an additional setting in your PowerPoint project. First, follow our 5-step tutorial on how to create a PowerPoint Morph effect. But instead of a rectangle, insert text on your initial slide. You can now design the duplicated text field on the second or target slide. Feel free to change the font, color, size and position in addition to the text content.

After you’ve selected Transitions > Morph in the fifth step, click on Effect Options which you’ll find to the right of the Transitions selection pane. Select Characters or Words. This provides PowerPoint with the necessary additional information for a flawless Morph effect.

Add a zoom effect to images using PowerPoint Morph
The Morph effect offers another exciting way to make graphics and photos in your presentation more interactive. Here, the slide transition is used to zoom in on a portion of the image. This is a great way to use a new kind of storytelling effect to make your next presentation more engaging and dynamic.

First, upload any photo or graphic to a new, empty slide in your PowerPoint project. Next, duplicate the entire slide using the CTRL + D command or by right-clicking on the slide thumbnail and selecting Duplicate Slide.

Now that you have the starting and target slide for your PowerPoint Morph effect, define the section you want to zoom in on. To do this, you need to crop the photo on the second slide. Select the image and open the Picture Format tab at the top of the screen. Click on Crop.

Drag your mouse while holding down the CTRL key to frame the desired section of the image without distorting proportions.

Unclick Crop and drag the edges of the cropped image until it completely fills the slide. Again, using the CTRL key while dragging the mouse can help keep the proportions of the image intact.
The next step is where the PowerPoint Morph transition comes into play:

Make sure you have selected the target slide. Go to Transitions > Morph. Now you can test the Morph animation by clicking on the Preview button.
In the Timing group you can adjust the duration of the transition and even add short sound effects!

Conclusion: Rely on the PowerPoint Morph transition to give your slides a surprising effect!
PowerPoint Morph allows you to create high-quality animations. This modern transition effect livens up presentations, enhancing creativity and dynamism in your presentation. It can focus the audience’s attention on specific details through targeted use.
For those already proficient in PowerPoint, the Morph feature can be used to create almost autonomously running presentations. The Morph function is fully available to users of newer PowerPoint versions, such as PowerPoint 2019 and PowerPoint Web. Subscribers to Office 365 can also enjoy this feature. Morphing is not always backwards compatible (see table: “Requirements for PowerPoint Morph”).
Need assistance with creating or implementing a PowerPoint Morph effect in your presentation? Or do you have other issues and questions regarding PowerPoint? Do not hesitate to reach out. For any inquiries, my email is available: [email protected].
Looking for visually supportive and professionally designed slide templates? Feel free to browse our shop. We have numerous pre-prepared slides on various (business) topics available for download. Visit today! ► To the Shop
Articles you might also be interested in:


